How do I test the Server?
Testing your Server code in a SAFE app is just the same as in any other dotnet app, and you can use the same tools and frameworks that you are familiar with. These include all of the usual suspects such as NUnit, XUnit, FSUnit, Expecto, FSCheck, AutoFixture etc.
In this guide we will look at using Expecto, as this is included with the standard SAFE template.
I'm using the standard template
Using the Expecto runner
If you are using the standard template, then there is nothing more you need to do in order to start testing your Server code.
In the tests/Server folder, there is a project named Server.Tests with a single script demonstrating how to use Expecto to test the TODO sample.
In order to run the tests, instead of starting your application using
dotnet run
you should instead use
dotnet run WatchRunTests
Prior to template version 5.0.8, the command to run the tests was
dotnet run RunTests
This will execute the tests and print the results into the console window.

This method builds and runs the Client test project too, which can be slow. If you want to run the Server tests alone, you can simply navigate to the tests/Server directory and run the project using
dotnet run.
Using dotnet test or the Visual Studio Test runner
If you would like to use dotnet tests from the command line or the test runner that comes with Visual Studio, there are a couple of extra steps to follow.
1. Install the Test Adapters
Run the following commands at the root of your solution:
dotnet paket add Microsoft.NET.Test.Sdk -p Server.Tests
dotnet paket add YoloDev.Expecto.TestSdk -p Server.Tests
2. Disable EntryPoint generation
Open your ServerTests.fsproj file and add the following element:
<PropertyGroup>
    <GenerateProgramFile>false</GenerateProgramFile>
</PropertyGroup>
3. Discover tests
To allow your tests to be discovered, you will need to decorate them with a [<Tests>] attribute.
The provided test would look like this:
[<Tests>]
let server = testList "Server" [
    testCase "Adding valid Todo" <| fun _ ->
        let storage = Storage()
        let validTodo = Todo.create "TODO"
        let expectedResult = Ok ()

        let result = storage.AddTodo validTodo

        Expect.equal result expectedResult "Result should be ok"
        Expect.contains (storage.GetTodos()) validTodo "Storage should contain new todo"
]
4. Run tests
There are now two ways to run these tests.
From the command line, you can just run
dotnet test tests/Server
Alternatively, if you are using Visual Studio or VS Mac you can make use of the built-in test explorers.
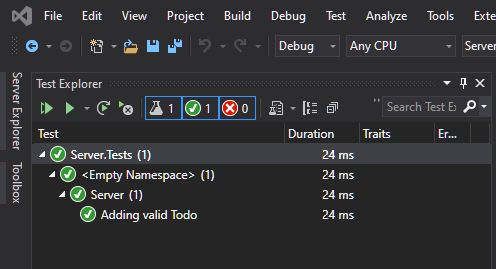
I'm using the minimal template
If you are using the minimal template, you will need to first configure a test project as none are included.
1. Add a test project
Create a .Net console project called Server.Tests in the tests/Server folder.
dotnet new console -lang F# -n Server.Tests -o tests/Server
dotnet sln add tests/Server
2. Reference the Server project
Reference the Server project from the Server.Tests project:
dotnet add tests/Server reference src/Server
3. Add Expecto to the Test project
Run the following command:
dotnet add tests/Server package Expecto
4. Add something to test
Update the Server.fs file in the Server project to extract the message logic from the router like so:
let getMessage () = "Hello from SAFE!"

let webApp =
    router {
        get Route.hello (getMessage () |> json )
    }
5. Add a test
Replace the contents of tests/Server/Program.fs with the following:
open Expecto

let server = testList "Server" [
    testCase "Message returned correctly" <| fun _ ->
        let expectedResult = "Hello from SAFE!"
        let result = Server.getMessage()
        Expect.equal result expectedResult "Result should be ok"
]

[<EntryPoint>]
let main _ = runTestsWithCLIArgs [] [||] server
6. Run the test
dotnet run -p tests/Server
This will print out the results in the console window
7. Using dotnet test or the Visual Studio Test Explorer
Add the libraries Microsoft.NET.Test.Sdk and YoloDev.Expecto.TestSdk to your Test project, using NuGet.
The way you do this will depend on whether you are using NuGet directly or via Paket. See this recipe for more details.
You can now add [<Test>] attributes to your tests so that they can be discovered, and then run them using the dotnet tooling in the same way as explained earlier for the standard template.